Data Migration module allows transferring data from the former versions of Sitecore to later Sitecore releases (see the Supported Sitecore Versions section). The module does not convert the databases; it extracts all the data and puts it into the new database.
The module requires two Sitecore installations working simultaneously – the source installation and the target installation. Please refer to the Module Architecture section for more information on how the module works.
You should also refer to the articles below for more information on migration process:
1. User Manual
Please refer to the general migration recommendations section on SDN before proceeding.
Start the Migration Wizard:
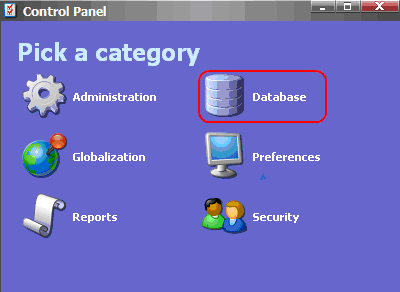
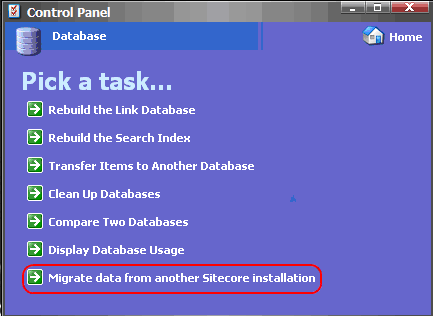
Open Control Panel (Sitecore » Control Panel), select Database and then the Migrate data from another Sitecore installation link.
The Migration Wizard will be activated:
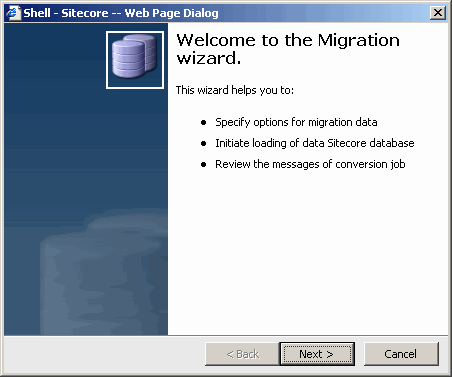
The Wizard consists of 6 pages:
- start page,
- general options,
- Items for migration,
- specific options for service (this page may not be shown depending on the service),
- migration results,
- final page.
Click Next to continue.
1.1. General Options
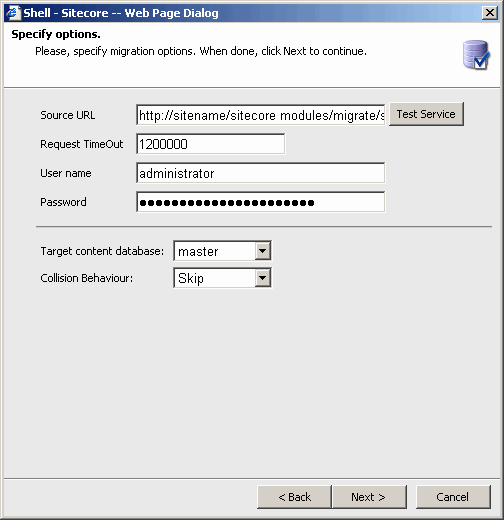
Source URL
Enter the path to the migration service in the source installation here. By default, the service is located under sitecore modules/Migrate/Service folder, so the path will normally look like this:
http://sitename/sitecore%20modules/Migrate/Service/MigrationService.asmx
You can use the full path or just the hostname. For example: sitename or sitename:81, where sitename is the host name, and 81 is the port number.
The Test Service button allows you to check the service availability and user credentials.
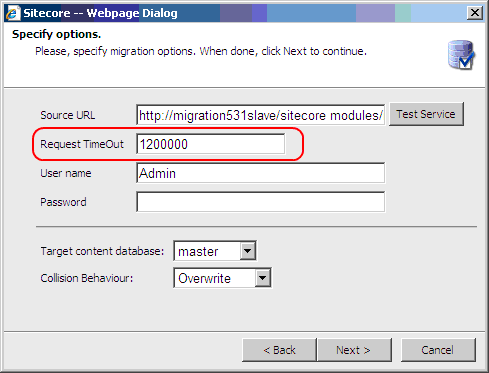
Request TimeOut
Time span (in milliseconds) over which the module will wait for a response from the service. When this time has expired, the module sends a new request to the service. By default, the value of this option is 1200000 (20 minutes). This value is read from the migration module settings item (/sitecore/system/modules/migration/settings). Do not type too large a value into this field. If the TimeOut value is too large, your service will wait to see if, for any reason, the asp_net (w3wp) process on your source server has been restarted.
User name, Password
Enter your user credentials which will be used for authentication on the service side.
Note: a user from the target installation needs to know the login and password of a user who has administrator’s rights for the source installation.
Target content database
The target database for migrated data. All the data will be transferred into the selected database. This option can be changed manually in the next step of the wizard for specific items.
Collision behavior
The behavior specified here will be used if items with the same GUIDs are found in the source and target database.
-
Skip
If Items with the same IDs are found, the Item with all it’s versions and children from the target database will be kept. In other words, if the target database contains items with the same ID, the whole subtree (items with its children) will be skipped.
-
Overwrite
If Items with the same IDs are found (even if the location for these items is different from the location of the migrated items), the Item with all it’s versions and children from the source database will replace the one on the target database.
-
Merge
If Items with the same IDs are found, the versions of the Items and corresponding children are merged (the version will be deleted and added from the source items but the items themselves won’t be deleted). Items from the source database which are not present in the target database will be added; Coinciding Items from the target database will overwrite the ones from the source database.
-
ClearChildren (available only in versions prior to 1.5.0)
If Items with the same IDs are found, the versions of the Items are merged. If the Item in the source database has children, they will be added to the Item in the target database (children present before transferring will be removed); if the Item in the source database has no children, the children of the Item in the target database will be removed (if any).
-
Append
If Items with the same IDs are found, the Item with all it’s versions from the target database will be kept, but the children from the source database will be appended.
Smart Transferring
This options allows the user to enable Smart transferring mode and select extended transferring options:
Transfer Missing Templates
If smart transferring mode is enabled this option means;
- If you are trying to transfer an item which is based on a missing template (i.e. the template is not present on the target solution) , this template will be transferred automatically.
- Any missing templates will be transferred to the User Defined folder under /sitecore/templates or if this folder does not exist the template will be transferred to the templates root folder.
Transfer missing masters
If smart transferring mode is enabled this option means;
- If you are trying to transfer an item which was created from a missing master (i.e. the master is not present on the target solution), the master will be transferred automatically.
- The Missing master will be transferred to the masters root folder.
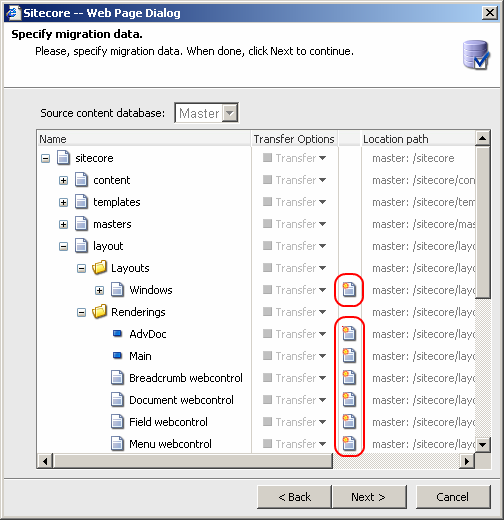
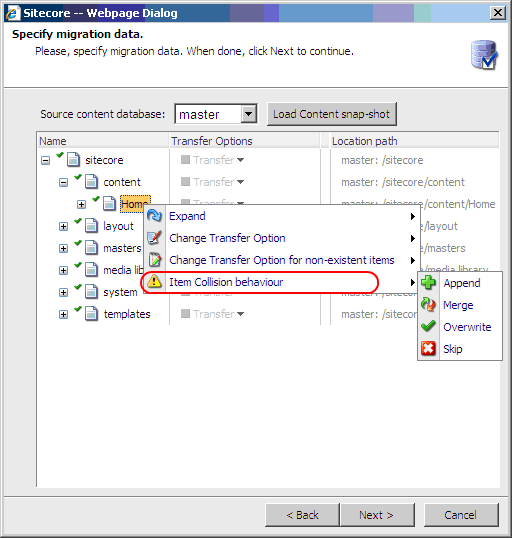
1.2. Choose the Data for Migration (transferring)
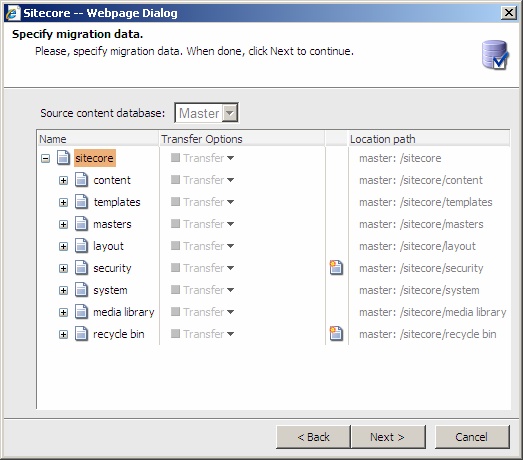
On this page, you can choose the source database (Source content database drop down list). Every change of the database renews the content tree and resets the selections.
It is possible to transfer data from one database only.

Now take a look at the content tree. This tree consists of four columns: the source content tree, transfer options, image icon which shows that item is not present in the target database and the location path.
The content tree shows the items, which can be migrated. By default, all of the items have the inherited transfer option. It means that they inherit transfer settings from their parent Items. By default, all elements are in the inherited state which means that no Items will be transferred.
Transfer Options
To allow migration of the parent element and deny migration of its children, you should expand the appropriate Item, switch the transferring option to Allowed for the Item itself, and set the transferring option for children to Denied.
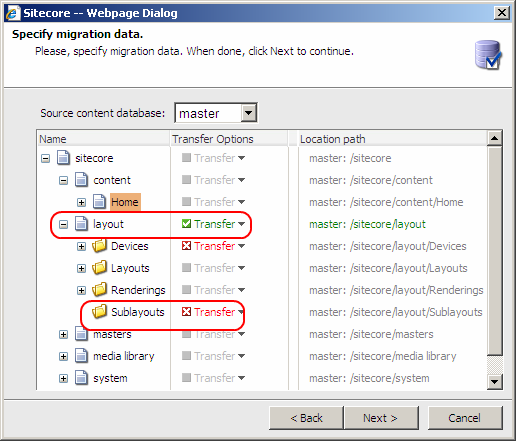
In the example above, Layout, Layouts and Renderings will be transferred but Devices and SubLayouts will not.
To change the transferring option, click on the Transfer link to switch it to the Allowed (Green and ticked) or Denied (Red and crossed) state.

Note:
Collapsed and expanded states for tree nodes influences the collision behavior. For example, consider the following situation:
- Transferring for the Home item is allowed. The collision behaviour is set to skip.
- There is an item with the same ID as Home has (collision occurs).
- If the Home item is collapsed, none of its children will be transferred, if the item is expanded, each child will be transferred depending on its transfer settings, only the Home item will be skipped.
Location path
This column allows you to choose the destination location of the migrated items. In order to use this column, you should allow transferring for the corresponding item in the content tree. This functionality is not active for Items which are not to be transferred.
For Items with the inherited Allowed option the location is defined as parent path+item name.
If the location of an item cannot be defined (it occurs for items for which the parent is not present in the target database) as shown in the picture below, a message will be displayed as a user tries to proceed to the next step.
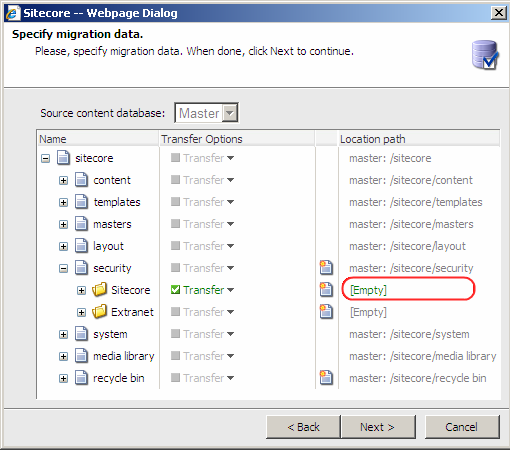
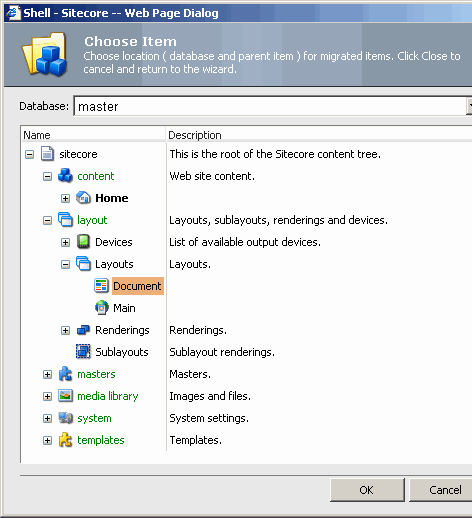
To change the destination location of an Item, you need to allow the transfer of this item. After that, the corresponding link in the Location path column will change its status to Empty. Click this link and choose the parent item under which the transferred Item will be located.
After all the data has been selected and all locations are defined, click Next to continue the migration process.
A new feature has been added: it allows viewing the items, which are not available in the target database, but they present in the source database. These items are marked with a special icon available in the third column of the migration tree (see the screenshot below):
Note: The status of the parent item does not depend on whether children items have been added.
Context Menus
The context menus provide a convenient way to configure the transferring options. The context menu consists of four menu items:
-
Expand

Used to expand the tree under the selected item two or three levels deep. Select the option to expand the items which are supposed to be transferred and are still not in the target database
By default there are only three submenu items in the expand menu. But you can configure any number of levels to be expanded in the context menu by modifying the items under /sitecore/system/modules/migration/context menu:
-
Change transfer option
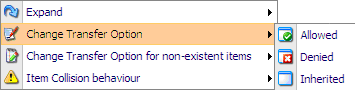
Used to change the transferring option (Allowed\Denied\Inherited) for all expanded items under the selected item (including this item itself). -
Change Transfer Option for non-existent items
The functionality is the same as that of the previous option but it can be applied to non-existent items (items which exist in the source solution but don’t exist in the target solution. Such items are marked by the icon: )
)
-
Item collision behavior
Used to change the collision behavior options (overwrite\merge\append\skip) for each item to be transferred. The option is applied to the selected item only. For all other items the collision behaviour will be as chosen on the General Options wizard page.
1.3. Extended Migration Options
This page allows you to specify extended migration options which are shown in the picture below (options for transferring from Sitecore 4.3.2.X):
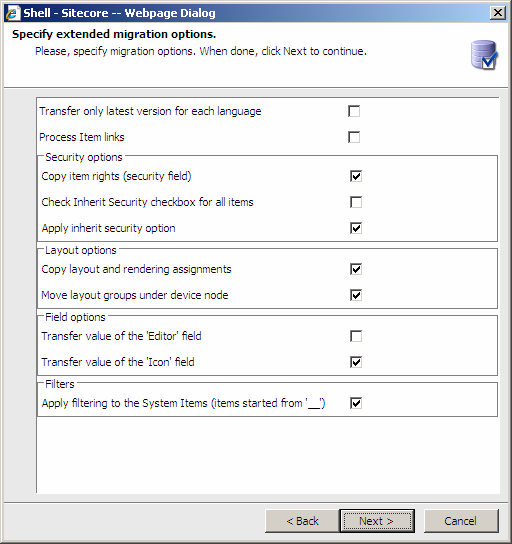
Options on this page depend on the version of the migration service you use for transferring. For Sitecore 4 Service users will see the options shown in the previous picture. Below is a description of each option:
-
Transfer only latest version for each language
If this option is checked only the latest versions of the item, for all languages, will be transferred. This option is useful if you do not track the history using item versions. Transferring only the latest versions is a little bit faster. -
Process Item links
If this option is checked, a proxy item will be generated during the item transfer with the filled Item link field. -
Security Options
-
Copy items rights (security field)
If this option is checked the security assignments for each item from Sitecore 4 will be converted to Sitecore 5 form. If this option is unchecked security assignments will be transferred as they are. Other security options such as Apply inherit security option are not valid without this option being checked.
-
Check Inherit Security checkbox for all items
This option means that all transferred items will have the inherit security checkbox (seen in the Security Editor, for instance) checked in the target database.
-
Apply inherit security option
This option compares the security settings of the parent item and of each of its children. If the settings are equivalent, the Inherit security then the checkbox is checked for the child. When this option is on, the Check Inherit Security checkbox for all items option is hidden and ignored.
-
Copy items rights (security field)
-
Layout Options
-
YYCopy layout and rendering assignments
If this option is checked the layout and renderings configuration for items in Sitecore 4 will be converted to the appropriate configuration style of Sitecore 5. Assignments will be converted without any verification of a layouts or a renderings existence.
-
YYMove layout groups under device item
Layout groups are not present in Sitecore 5. The Layout group in Sitecore 4 has two meanings. The first is the same as Device in Sitecore 5, the second is simply analogous to folders in Sitecore 5. If this option is checked, items which are located under /system/layout groups in Sitecore 4 will be transferred as Devices to Sitecore 5.
-
YYCopy layout and rendering assignments
-
Field Options
-
Transfer value of the Editor field
Editors in Sitecore 4 and Sitecore 5 are different. Many of them are set by default in Sitecore 5. If this option is unchecked the values of the editor fields will not be transferred.
-
Transfer value of the 'Icon' field
Path to the icons in Sitecore 4 and Sitecore 5 are different. If this option is unchecked the values of the icon fields will not be transferred.
-
Transfer value of the Editor field
-
Filters.
this option allows you to filter converted data.- Apply filtering to the system items
This option allows you to skip the transferring of the system items (items, the names of which start with the underscore “__”)
The next two pages show the flow of the migration process and the results.
The last page displays the summary and closes the wizard.
Note: The Link database and the search index should be rebuilt after the migration is complete.
- Apply filtering to the system items
1.4. Migration module config item
The migration module configuration item is placed here: /sitecore/system/modules/migration/settings and has 3 main sections:
- Data
- Backup
- Autosave
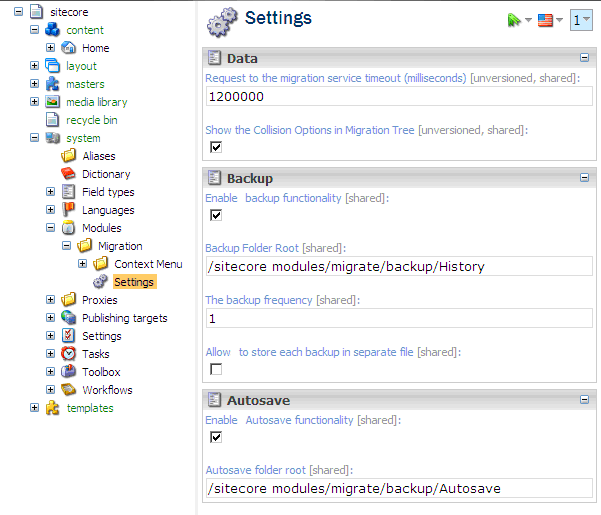
Each section defines a set of options, see the detailed description of each section below.
1.4.1. Data section

This section defines two configuration options:
-
Request timeout. The time span (in milliseconds) over which the module will wait for a response from the service. This check is applied to each request. The value from this field will be entered into the appropriate field of the wizard as shown below:
-
Show the collision options in the migration tree.
This option defines whether the collision option will be shown in the migration tree or not as shown below: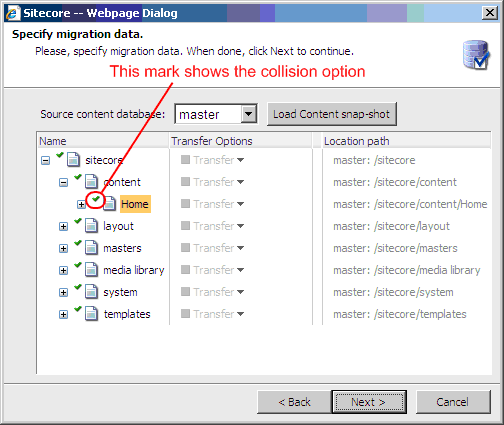
1.4.2. Backup section
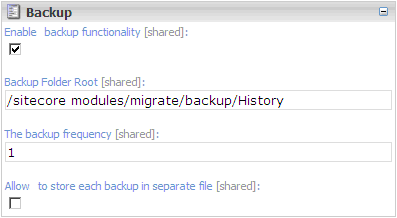
This section defines the configuration of the migration module backup functionality. The purpose of this functionality is to prevent problems with data if something goes wrong. For example if the ASP.NET or w3wp processes shut down abnormally during the transferring process, this will result in partially migrated data. The backup functionality allows you to create the backup/restore points during the transferring process, so that you can start transferring from the last restore point should there be any problems. By default restore points are created for each request to the service.
The Backup section consists of 4 options:
-
Enable backup functionality
When checked this enables backup functionality, when unchecked backup functionality is disabled.
Note: Backup functionality is enabled by default. -
Backup folder root
Defines the root folder in which the backup/restore points are stored. -
Backup frequency
Defines the backup frequency. The default value is 1, which means that a data backup will be made after each successful request to the service. -
Separate backups
Allows you to store each backup/restore point in a separate file. This option is disabled by default.
When the backup functionality is enabled the Migration Wizard will perform a check before the data selection step. The backup file will be examined and if the wizard detects that the previous transfer for the selected service path and database was broken, the following page will be shown:
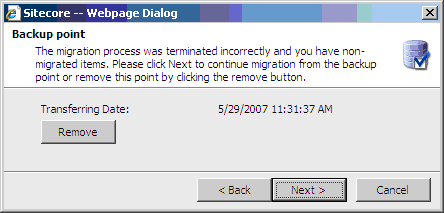
Click the Next button to start the migration process from the last restore point – the wizard will transfer only those items which were not transferred during the previous attempt. After the migration has started, this restore point will be marked as processed and will never be shown again.
If you click the Remove button the usual migration process will be started and the current restore point will be marked as processed.
1.4.3. Autosave section
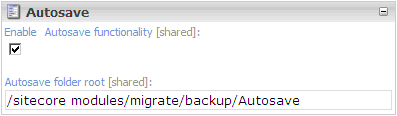
This section allows users to save and load the tree selection configuration. If the autosave option is enabled the tree selection will be saved automatically when the migration process is started. You can load the selection by clicking the Load content snap-shot button.
This section has two options.
If the autosave option is enabled users can see the Load Content snap-shot button on the selection wizard page as shown below.
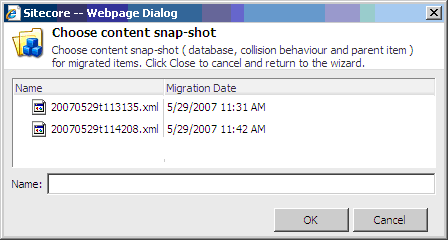
Clicking on this button allows the user to load one of the saved selections as shown below.
To load a saved selection select a file and click Ok to load the selection or Cancel to return to the wizard without any changes.
The migration process is quite complex when you are transfering data between versions of Sitecore with a large gap between versions (for example Sitecore 4.3.X and Sitecore 5.3). You should have a sound knowledge in both versions of Sitecore to ensure that the transfer goes as smoothly as possible. This section describes the workflow and general recommendations on data migration. By default, Sitecore has the following first-level Items: These steps need to be carried out BEFORE Data Migration begins You should inspect the count of the content nodes for security, content, media library, layouts, renderings etc and save your results into a report. You will need it after transferring is complete to be sure that you have migrated all the content items.
Source Solution
Target Solution
Collision options: Merge for all items The first step in transferring data is to transfer the languages. Transfer all the items under /sitecore/system/languages.
IMPORTANT NOTE: If you forget to transfer a language, your content items will lose their data for this language. Remember that language items in Sitecore 5.3 have restrictions for their names. The migration module will rename your language items to a more acceptable format (ISO-Regional code) if necessary. (See the Version Handlers section – Language Handler). Collision options: Merge for all items We have special handlers which deny the transfer of Users and Roles with the same names. Check the Migration log files. If you have any errors you should resolve them by using mapping or you can delete users with the same names on the Target solution and retransfer again using Merge for the collisions.
Note: Do not transfer Users and Roles (Groups for Sitecore 4.3.X) with the Overwrite option. Use the Merge option instead. The problem is that you should be logged in to Sitecore to use Migration Wizard. If you transfer the Users folder with the Overwrite option your user ID will be recreated during the transferring process. You will then be be logged out during the operation. Collision options: Overwrite all items If you have custom field types you should transfer them, they are stored along with the standard field types in sitecore/system/Field types .
NOTE: Do not transfer the standard field types. The following is a list of the standard field types. Attachment Collision Option: Append for Standard templates and Merge or Overwrite for your Own templates.
Problems: to be aware of After templates have been transferred you should correct the template Icons. Try to find the appropriate icons throughout the standard sitecore items (/sitecore/shell/Themes/standard). If you can't find the appropriate icons you should create a special folder (e.g. Images) and copy new icons to this folder. You should make sure these items have been resized to the 16x16, 24x24, 32x32 and 48x48 standard dimensions used within Sitecore and give them appropriate names (i.e. myIcon16x16.png, etc). Collision Option: Append
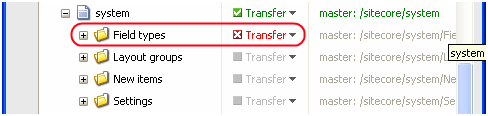
Collision options: Merge/Append System Data is the items in various folders under the sitecore/system folder. You should set the transfer option of the Field types Item to Deny (see below) when setting transfer options for the system Item.
If you are transferring data from Sitecore 5.X to Sitecore 5.X, you can use the Append option for transferring. This allows you to skip the same items and migrate only new items. If you are transferring data from Sitecore 4, you should select only the essential data, for example, configuration for some modules, Layout groups etc. Common items for transferring: Collision option: Merge. You can set transfer options for the layouts and renderings directly; just make sure they are transferred properly after the migration process is finished. But the best way is transfer these items separately (as shown below) and expand the transferred nodes as much as possible.
Notes:
Collision option: Merge Collision option: Overwrite
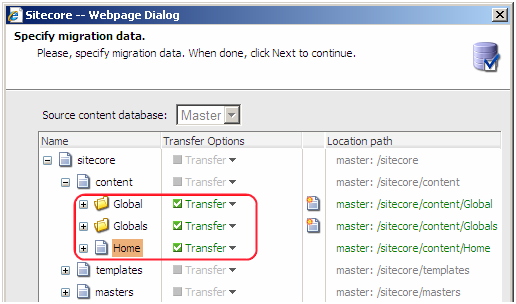
IMPORTANT NOTE: Due to the fact that Sitecore 5 has a system Item named content, we recommend not to set transfer options for the content Item itself. It’s better and safer to unfold it and set transfer options for every content Item under it.
To transfer a large amount of items you should split your content tree into branches and transfer them separately. After each transfer iteration you should ensure that your transferred data is correct.
Recycle Bin
Note: Do not transfer the contents of the Recycle Bin from Sitecore 4 to the Recycle Bin of Sitecore 5. This is because the Items are stored in a special format in the Sitecore 5 Recycle Bin database – Items contain a single xml field which holds the value of the original database records.
Dealing with Underscores
If you want to transfer items whose names start with an underscore (__), you should disable Filters first:
Dealing with Item names
One of the most common issues in Sitecore 4 to 5 migration is item names. Sitecore 5 has much more strict item naming rules by default. These are: You can control 2 out of the 5 restrictions via the web.config. Their default values are:
<setting name="InvalidItemNameChars" value='\/:*?"<>|[]' /> Migration from Sitecore 4 should have as few changes as possible to preserve URLs and item links. The Sitecore database migration tool implements the following logic when an item name does not conorm to the rules for Sitecore 5.3: Item naming rules are enforced from 1 to 4 one by one: If the item name is still not accepted by Sitecore 5.3, it means that the name doesn't match the ItemNameValidation pattern and the upgrade tool has no other choice but to give up and replace the name with Invalid Name. To avoid this, users can tweak the ItemNameValidation pattern or even disable it completely when performing the upgrade procedure and then reenable it again to make sure that new items comply with the best practice rules.
Workflow History
If you are transferring from Sitecore 5.X and you need to move the workflow history data to an upgraded solution you should copy the History data manually. After you have transferred all the content you should perform the following steps: This section deals with guidelines for optional considerations for Data Migration. This section deals with common code changes that you may want to consider.
Upgrading Layouts
These are some of the common layout code changes that you may need to consider.
Note: if you convert to Sitecore with a version earlier than 5.3.0 you should use <%= instead of <%#. For Sitecore 5.3.0 and later you should enable the AutomaticDataBind setting to allow the preview for your items.
Upgrading XSL controls
There are some changes you need to consider with regards to your XSL controls. This section deals with the process of upgrading certain modules during the data migration.
LDAP Module
Migrating from Sitecore v4.3
Migrating from Sitecore v5.1/5.2
Mailing List Module
From Sitecore 4.X
Metatags Module
From Sitecore 4.X
This section deals with some steps you may want to consider when testing your migrated solution. This section deals with the final step after a satisfactory migration. Once you are satisfied that you solution has migration to expected standards then back-up your new solution. To properly transfer proxy items, you should comment out the shadow dataprovider (<shadowProvider>) section in the web.config file of the source installation (/sitecore/databases/database [name="<databaseName>"]). In Sitecore 5.3, you can set <proxiesEnabled> to false for any database as shown below: <proxiesEnabled>true</proxiesEnabled>. If shadowProvider/proxy isn’t disabled, real items will be transferred instead of the proxy item. Installation package of the Migration wizard for Sitecore 5.3.1 will install the configuration file for the module (by default the file will be located here: '/app_config/migrationmodule.config'). The configuration of the transferring process is set in this file. The MigrationModule.config file consists of the following sections: The same configuration sections are present for Migration module for Sitecore 5.1.X and Sitecore 5.2.X, except for the contentMapping section, but it is placed in the Web.config file directly. Migration section contains the same sections as were described earlier but the versionHandler and itemHandler sections are empty by default. This section defines the rules for the transferred items. Content of the fields of items which pass the requirements specified in this section will be processed (source substrings will be replaced with target substrings) Below we provide two examples where this functionality is extremely useful: This section describes mappings for the content of fields. The following sections are described: Templates, Items, Fields and contentEntries: For example: we have a language item in Sitecore CMS 4.3.2.13 with an incorrect ISO code – ‘danish’. We are planning to migrate the solution to Sitecore CMS 5.3.X and we don’t want to make any changes to the source solution as well as register a language with ‘danish’ ISO code in the target solution. Migrating this language item will give the error:
Could not parse the language 'danish'. Note that a custom language name must be on the form: isoLanguageCode-isoRegionCode-customName. The language codes are two-letter ISO 639-1, and the regions codes are are two-letter ISO 3166. Also, customName must not exceed 8 characters in length. Valid example: en-US-East. For the full list of requirements, see:
http://msdn2.microsoft.com/en-US/library/system.globalization.cultureandregioninfobuilder.cultureandregioninfobuilder.html
The mapping functionality allowa to handle this problem by adding 2 mappings: one for the ISO field for the items based on the Language template and the second one for the Language of the item. The first mapping is simple: Where {F68F13A6-3395-426A-B9A1-FA2DC60D94EB} is the ID of the Language template and {C437E416-8948-427D-A982-8ED37AE3F553} – the ID of the ISO field in this template The second mapping is needed to correct the language description of the item. See the text in bold in the xml structure of the item: To change the ‘danish’ to ‘da’ in the version description we should add the special constant ‘ItemLanguage’ which describes the language for each item version. It is possible to add additional constants for the other values such as ‘name’, ‘key’, etc. So the mapping is: This section defines mapping of the item IDs during transferring. By default, this section contains mapping for correct transfer of media items from Sitecore 4.3.2.X and Sitecore 5.1.X, 5.2.X. Section can contain different mapping for different Sitecore version. See the mapping section for Sitecore 5.3: This mapping handles problems with transferring images to Sitecore 5.3. Sitecore 5.3 has two types of media templates: versioned and unversioned media templates. The Image and File template from Sitecore 4.3.2.X and Sitecore 5.1/5.2 have unversioned field ‘path’, so it will be correct if we transfer them to the Unversioned image and file template from Sitecore 5.3 which has a shared ‘path’ field. But there is a big problem, as we have different IDs for these templates in the target and source instances. Moreover, Sitecore 4.3.2.x has no template inheritance which is available in Sitecore 5.3. Thus we should not only map templates to each other, but also map their fields which are inherited from other templates. See the fist section in the mappings: <!-- Image template --> <add sourceID="{C97BA923-8009-4858-BDD5-D8BE5FCCECF7}" targetID="{F1828A2C-7E5D-4BBD-98CA-320474871548}"/> <!-- Path field --> <add sourceID="{B48AF244-B099-44CE-B8B9-3D3C14194C06}" targetID="{47FA03A6-A52C-4BE7-A726-B3A8BB3254D6}"/> <!-- Alt field --> <add sourceID="{8CF45D0E-ADD4-4772-911A-AC6FC50F9C7D}" targetID="{65885C44-8FCD-4A7F-94F1-EE63703FE193}"/> <!-- Description field --> <add sourceID="{240432D4-3604-46B1-A0F5-78ABC6766486}" targetID="{BA8341A1-FF30-47B8-AE6A-F4947E4113F0}"/> <!-- Title field --> <add sourceID="{DC34A2CA-4E0A-4640-B375-62B79F67AFF8}" targetID="{3F4B20E9-36E6-4D45-A423-C86567373F82}"/> This section maps Image template ID from Sitecore 4.3.2.X to unversioned Image template ID in Sitecore 5.3: <add sourceID="{C97BA923-8009-4858-BDD5-D8BE5FCCECF7}" targetID="{F1828A2C-7E5D-4BBD-98CA-320474871548}"/> Where {C97BA923-8009-4858-BDD5-D8BE5FCCECF7} is the ID of the Image template in Sitecore 4.3.2.X and {F1828A2C-7E5D-4BBD-98CA-320474871548} is the ID of the unversioned image in Sitecore 5.3. All other field mappings (alt, description, path, etc) are mapped in the same way.
Note (For Sitecore 5.3 only): If you are going to transfer data from Sitecore 5.3 to Sitecore 5.3, you should remove or comment all mappings to the media templates.
Note (For Sitecore 5.3 only): If you are going to transfer without inserting into blob fields and your Sitecore 4.3.2.X solution has the Media module installed, then after migration the height and width fields for media items which were based on the “__JPG Image” and “__GIF Image” templates will be filled by values from the one of the transferred language from the item. We have such behavior because these fields are shared in the unversioned Image template in Sitecore 5.3 but they are versioned in Sitecore 4.3.2.X. So if the value for these fields is filled not for all languages of this item, it is possible that after migration they will be empty (if the language with empty fields was transferred). This section describes the classes which are used for handling invalid item names. For example, in Sitecore 4.3.x it was possible to create items the names of which contained some characters which are denied in Sitecore 5.3 (for example, ‘/’, ‘&’ etc.). When users try to migrate an item with such names, the Migration Wizard tries to change the name. For these purposes it uses the classes defined in the invalidItemNameHandlers section. By default, this section has the following handlers: <invalidItemNameHandlers> <add type="Sitecore.Modules.Migrate.Utils.ItemNameHandlers.InvalidCharactersStripper, sitecore.migrationwizard" mode="on"/> <add type="Sitecore.Modules.Migrate.Utils.ItemNameHandlers.AtReplacer, sitecore.migrationwizard" mode="on"/> <add type="Sitecore.Modules.Migrate.Utils.ItemNameHandlers.DashReplacer, sitecore.migrationwizard" mode="on"/> <add type="Sitecore.Modules.Migrate.Utils.ItemNameHandlers.ItemNameCutter, sitecore.migrationwizard" mode="on"/> <add type="Sitecore.Modules.Migrate.Utils.ItemNameHandlers.DefaultInvalidItemNameHandler, sitecore.migrationwizard" mode="on"/> </invalidItemNameHandlers> As the Migration Wizard converts items with incorrect names, it will use the “Sitecore.Modules.Migrate.Utils.ItemNameHandlers.InvalidCharactersStripper” class instance first. If the name is still incorrect, it will use the “Sitecore.Modules.Migrate.Utils.ItemNameHandlers.AtReplacer” class instance and so on. You can manage the handlers which will be used during the migration process by adding, deleting handlers or changing the ‘mode’ attribute for the appropriate handler. To add your own handlers, you should add new records to this section. Your class should implement the “Sitecore.Modules.Migrate.Utils.IInvalidItemNameHandler” interface which is defined in the Sitecore.MogrationWizard asembly. This section describes preprocessors which will process data before transferring. These processors can make changes in the transferred data before it will be processed by the wizard. You can implement your own pre-processor. This processor should implement the “Sitecore.Modules.Migrate.Utils.IPreProcessor” interface which has only one method – Process. This method takes the array of deserialized versions for the transferred item and transferred options. By default, this section has two processors – KnownMediaTypeProcessor and DomainEntityProcessor. The KnownMediaType processor is used for correcting templates for transferred media items. Sitecore 5.3 has some additional media templates such as “Flash”, “Jpeg”, “Mp3” etc. It would be nice if items which were based on the Image or File templates in the earlier versions of Sitecore but referred to the files with a known extension (see web.config's Media section for Sitecore 5.3) are based on the appropriate templates after transferring. For example, a media item based on the File template which refers to the flash file (*.swf) after transferring should have not the 'File' but 'Flash' template. The KnownMediaType handler resolves the file extensions and changes the type of the template for media items during transferring. It is disabled by default. Change the ‘mode’ attribute value to enable handler.
Note (Sitecore 5.3.1): this preprocesor is enabled by defoult for Sitecore 5.3.1.
The same situation with Sitecore 5.1-5.2 but by default these instances of Sitecore have only 2 media templates (File and Image). But this processor may be useful for transferring media from Sitecore 4.3.2.X (some images, such as bmp are uploaded with the File template instead of Image). The DomainEntityProcessor is used to prevent adding users or roles with the same name to the same domain. In this section the handlers for each field to be transferred are configured. There are 3 field handlers in this section by default: These handlers have additional parameters:
HTMLFieldHandler allows you to process values which are stored in the ‘html’ and ‘rich text’ field types. It scans the values and changes the references to physical files to the correct references to media items. This handler has additional parameters: ProcessLinks=on,processImages=on,processFlash=on,createMediaItems=off,processMediaForFolders=|/upload/|. Each parameter is described below:
Note: each field handler should be as simple as possible because each field handling is time consuming. Delete this handler if you don’t need to change the references in your image fields. You can add your own handler by implementing a new class which implements the “Sitecore.Modules.Migrate.Utils.IFieldHandler” interface which is defined in the Sitecore.MogrationWizard assembly and registering your type in the fieldHandlers section. If you want to use parameters in you handler, you can inherit your handler from the “Sitecore.Modules.Migrate.Utils.BaseHandler” abstract class which implements the functionality of the initialization parameters. This section defines the handlers for items to be transferred. When an item is transferred, the handlers defined in the itemHandlers section are called. These handlers perform the postprocessing of the transferred items. By default this section consists of the following handlers: proxy, rich text and SitecoreUser which are enabled by default. Note: in the earlier versions of Sitecore CMS this section contained only 2 handlers. The SitecoreUser handler was added in the version of the module for Sitecore CMS 5.3. Take a look at the proxy item. In the earlier versions of Sitecore (5.2 or 5.1) proxy items had 3 fields and could be created in any place in the content tree. In Sitecore 5.3 we have a special place for proxy items (/sitecore/system/proxies) and proxy items have an additional field (“source”). Thus, to correctly transfer proxy items from earlier versions of Sitecore, the proxy handler is implemented. It examines the template of the transferred item and processes it according to certain rules. Users can include their own item handlers by implementing classes which implement the “Sitecore.Modules.Migrate.Utils.IItemHandler” which is defined in the Sitecore.MogrationWizard assembly and registering their types in the itemHandlers section. For example, consider the functionality which replaces the “html” field type by the “rich text” type during transferring (the RichTextReplacer is included into configuration file by default). Sitecore 5.3 has the new “rich text” field type which is the preferred way to store formatted text. The code of the html field handler is shown below: The main idea of this handler is checking the transferred item. If an item has template field and its type is html, than change it to the “rich test”. To convert item fields to “rich text”, you should simply convert its template. If you include this handler in the itemHanlers section of the MigrationModule.config file, all “html” fields of the source templates will be exchanged to “rich text”. This section defines handlers for each item version to be transferred. When an item version is transferred, the handlers defined in the versionHandlers section are called. These handlers perform the postprocessing of the transferred item versions. By default, there is only one handler version in the configuration file – the language handler - which is used for correcting the name of the language item. But if you want to transfer media files to Sitecore database, you should change the value of the ‘mode’ attribute to ‘on’ for the items defined below: <add type="Sitecore.Modules.Migrate.Utils.VersionHandlers.MediaPathHandler, Sitecore.MigrationWizard" mode="on"/> <add type="Sitecore.Modules.Migrate.Utils.VersionHandlers.MediaHandler, Sitecore.MigrationWizard" mode="on"/>
The MediaPath handler collects information about transferred media items. This information is used during content items transferring.
The Media handler fills the blob fields for media items with media streams.
Note: Sitecore 5.3.1
By default, there are two enabled handlers in the configuration file – the language handler - which is used for correcting the name of the language item and MediaHandler – which is used for correct handling MediaItems (see detailed description below). But if you want to use HtmlFieldHandler, you should change the value of the ‘mode’ attribute to ‘on’ for the items defined below: <add type="Sitecore.Modules.Migrate.Utils.VersionHandlers.MediaPathHandler, Sitecore.MigrationWizard" mode="on"/> <add type="Sitecore.Modules.Migrate.Utils.VersionHandlers.MediaHandler, Sitecore.MigrationWizard" mode="on"/> MediaHandler enabled by default and used for copying media stream to blob or to the Media.BaseFolder (it depends from the parameters for this handler). Parameters: UploadAsBlob=on - means that file will be loaded to the database during migration UploadAsBlob=off - means that file will be downloaded to the special folder which is defined in the web.config file (Media.BaseFolder setting) OverwriteFiles=on - useful only for UploadAsBlob=off mode and means that media file with the same path will be overridden during migration Migration from 4.3.x Frequently asked questins concerning the Data Migration Tools. I keep getting exceptions when I am trying to connect to the service Possible reasons: I get an error when I click the Next button If you get an error (something like this one: Backup or Autosave folder not found) before starting migration this means that the packager didn't install either the Backup or Autosave empty folders, which are required for migration. In order to fix it you shuld create whichever of these folders are missing, manually. I get exceptions while migrating languages If you get an error while migrating languages one of the reasons for this problem is an incorrect ISO or regional code for this language. Have a look at your data and you should be attentive because ISO and Regional code are case-sensitive. To rectify this problem you can: I can see the login rendering instead of site content Source: 4.3.2.13 Target: 5.X The login rendering is shown on the page instead of the rendering with content. The problem in Login Rendering functionality is that it was changed from Sitecore 4.3.2.13 onwards. In the Sitecore 4.3.2.13 login rendering is shown for the logged in users who have no access to the current item but Sitecore 5.X shows the login rendering for the Anonymous user. To resolve this problem you should just remove the value in the Login Rendering field for each xsl, web control and sublayout There is a question mark in the language selector This means that you have migrated your language and data correctly but the language has an incorrect ISO-Regional code (as an example it may be in the wrong case). In order to fix this you should run a script in the master and web databases which will correct the language codes. Samples of the script can be found below: update unversionedfields set [language]='nb-NO' where [language]='nb-no' update versionedfields set [language]='nb-NO' where [language]='nb-no' I get a System.Data.SqlClient.SqlException error in the log files. Source: any Target: Sitecore 5.3.x If you found System.Data.SqlClient.SqlException errors in the migration log with stack traces like this: FATAL Unhandled exception while trying to transfering item '{XXXXXXXX-XXXX-XXXX-XXXX-XXXXXXXXXXXX}' The solution: You forgot to disable the Event Handlers for the Link database in item:deleted and item:saved events. Look at the Pretransferring workflow. On the live (source) site and target site I can see a different count of the menu, news, etc items and I am sure that the rendering is correct. If you run your target site on the master database it could be a problem with publishing functionality. Probably these items should not be published. You can either change the master database to web for your site or use the filterItems site attribute.
When checked this enables the Autosave functionality, when unchecked this option is disabled.
Note: This option is enabled by default.
The root folder where the content tree snap-shot is saved. 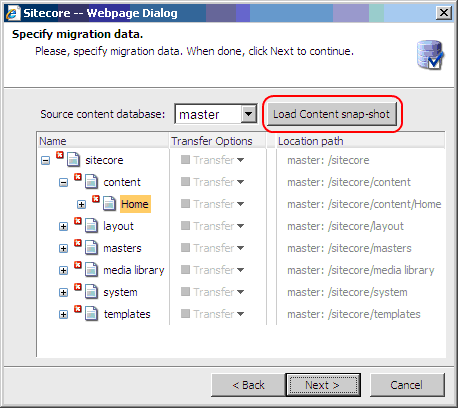
1.5.
Transferring Process and Options
1.5.1.
Pre Transfer Steps
Pre Transfer Steps
1.5.2.
Transfer Reccomendations
Considerations to be observed during the migration process
1.5.3.
Languages
Transferring Languages
After the language transfer is complete, make sure that the languages have been transferred correctly. To do this you can perform two simple checks.
1.5.4.
Security
Transfer the security database

1.5.5.
Custom Field Types
Transfer Custom Field Types
Checkbox
Date
Datetime
File
Html
Icon
iframe
Image
Internal Link
Layout
Link
Lookup
Memo
Multilist
Password
Reference
Rich Text
Security
Server File
Tree
Treelist
Tristate
Valuelookup1.5.6.
Templates
Transferring Tempates

Post Template Transfer
1.5.7.
Masters
Transferring Masters

1.5.8.
System Data
Transferring System Data
1.5.9.
Layouts and Renderings
Transfer your Layouts, Renderings and Devices

1.5.10.
Media Items
Transferring Media Items
1.5.11.
Content Data
Transferring Content Items
Keep in mind that if the data which you are trying to get from the service is too large, it will be automatically split and be separately transferred. In this case if you have a lot of first level children for an item, each child will be transferred separately within a single request. This will take considerably longer than splitting and transferring data in blocks manually.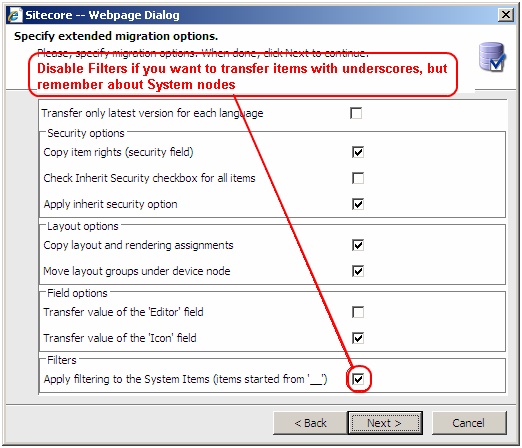
<setting name="ItemNameValidation" value="^\w[\w\s\.]*$" />
Note: The Migration Tool will not transfer any workflow history data because it is not part of the Sitecore item. 1.5.12.
Post Transferring Steps
PostTransferring Steps
1.5.13.
Post Transfer Guidelines
1.5.13.1.
Code Changes
<%@ Register TagPrefix="sc" Namespace="Sitecore.WebControls" assembly="Sitecore.WebControls" %>
to:
<%@ register TagPrefix="sc" Namespace="Sitecore.Web.UI.WebControls" Assembly="Sitecore.Kernel" %>
<meta id=scID content="<% Sitecore.State.CurrentItem.ID %>" name=scID>
to:
<meta id="scID" content="<%# Sitecore.Context.Item.ID%>" name="scID">
<meta id=scPath content="<%= Sitecore.State.CurrentItem.Path %>" name=scPath>
to:
<meta id="scPath" content="<%# Sitecore.Context.Item.Paths.Path%>" name="scPath">
<sc:generator runat="server" id="Generator1" />
to:
<meta name="generator" content="<%# Sitecore.Configuration.About.VersionInformation() %>">
<sc:iteminfo runat="server" id="Iteminfo1" />
to:
<meta name="sc_iteminfo" content="path=<%# Sitecore.Context.Item.Paths.Path.ToLower() %>; id=<%# Sitecore.Context.Item.ID.ToString() %>">
<meta id=scLanguage content="<%# Sitecore.State.Language %>" name=scLanguage>
to:
<meta id=scLanguage content="<%# Sitecore.Context.Language %>" name=scLanguage>
Sitecore.State
to:
Sitecore.Context
1.5.13.2.
Upgrading Modules
1.5.14.
Post Migration Testing
1.5.15.
The final Step
1.6.
Dealing with Proxy Items
When you transfer proxy items into Sitecore 5.3, they will be placed under the “/sitecore/system/proxies” item automatically.1.7.
Migration module config file
1.7.1.
contentMapping Section
(all sections above can use either a correct ID or the ‘*’ char as a value. ‘*’ means all IDs)
<contentEntry matchWholeText="true" caseSensitive="false">
<source>integer</source>
<target>text</target>
</contentEntry>
<templates>
<templateID>{F68F13A6-3395-426A-B9A1-FA2DC60D94EB}</templateID>
</templates>
<items>
<itemID>*</itemID>
</items>
<fields>
<fieldID>{C437E416-8948-427D-A982-8ED37AE3F553}</fieldID>
</fields>
<contentEntries>
<contentEntry matchWholeText="true" caseSensitive="false">
<source>danish</source>
<target>da</target>
</contentEntry>
</contentEntries>
</mapping>
<version language="en" version="1">
<fields>
<field tfid="{BA3F86A2-4A1C-4D78-B63D-91C2779C1B5E}" key="__sortorder" type="text">
<content>0</content>
</field>
…
</fields>
</version>
<version language="danish" version="1">
<fields>
<field tfid="{BA3F86A2-4A1C-4D78-B63D-91C2779C1B5E}" key="__sortorder" type="text">
<content>0</content>
</field>
…
</fields>
</version>
</item>
<templates>
<templateID>*</templateID>
</templates>
<items>
<itemID>*</itemID>
</items>
<fields>
<fieldID>__ItemLanguage</fieldID>
</fields>
<contentEntries>
<contentEntry matchWholeText="true" caseSensitive="false">
<source>danish</source>
<target>da</target>
</contentEntry>
</contentEntries>
</mapping>1.7.2.
Mapping Section
<add sourceID="{EB8EAEEE-00F5-4861-BC15-330AA0040156}" targetID="{15451229-7534-44EF-815D-D93D6170BFCB}"/>
<!-- Sitecore Users folder from 4 -->
<add sourceID="{EE9CC8CA-34F9-4610-A433-460B8D0A840D}" targetID="{73C32316-C412-4D57-A48D-D0EC9EE2F96E}"/>
<!-- Sitecore Groups folder from 4 -->
<add sourceID="{6F349757-73DE-4B73-8C8E-B17E96C0B197}" targetID="{AAFA5E5A-3F75-4C70-B39C-D2E97A11D74D}"/>
<!-- Extranet Users folder from 4 -->
<add sourceID="{F4F847B2-57C1-4CBD-A1B4-45131B42922E}" targetID="{73C32316-C412-4D57-A48D-D0EC9EE2F96E}"/>
<!-- Extranet Groups folder from 4 -->
<add sourceID="{6F349757-73DE-4B73-8C8E-B17E96C0B197}" targetID="{AAFA5E5A-3F75-4C70-B39C-D2E97A11D74D}"/>
<!-- Sitecore Admin user -->
<add sourceID="{C71338BB-09C1-4D0E-B10E-51553123F842}" targetID="{D152CB5F-7E8F-40A9-A017-29F0FCF15745}"/>
<!-- Sitecore Everyone role -->
<add sourceID="{A0607F3E-7214-4440-BB87-4C6FDC6AB948}" targetID="{00088163-665D-4F6F-9E63-C0CF1FB4E2FE}"/>
<!-- Extranet Everyone role -->
<add sourceID="{3B7BB5B7-2E92-49B5-A085-5A4FF8EEC528}" targetID="{00088163-665D-4F6F-9E63-C0CF1FB4E2FE}"/>
<!-- media templates mapping. Used for correct transferring of the media templates such as "__Image", "__JPG image" etc
to the unversioned media templates of the Sitecore 5.3.X. Remove or comment this mapping if you going ot transfer
media items from the Sitecore 5.3 -->
<!-- Image template -->
<add sourceID="{C97BA923-8009-4858-BDD5-D8BE5FCCECF7}" targetID="{F1828A2C-7E5D-4BBD-98CA-320474871548}"/>
<!-- Path field -->
<add sourceID="{B48AF244-B099-44CE-B8B9-3D3C14194C06}" targetID="{47FA03A6-A52C-4BE7-A726-B3A8BB3254D6}"/>
<!-- Alt field -->
<add sourceID="{8CF45D0E-ADD4-4772-911A-AC6FC50F9C7D}" targetID="{65885C44-8FCD-4A7F-94F1-EE63703FE193}"/>
<!-- Description field -->
<add sourceID="{240432D4-3604-46B1-A0F5-78ABC6766486}" targetID="{BA8341A1-FF30-47B8-AE6A-F4947E4113F0}"/>
<!-- Title field -->
<add sourceID="{DC34A2CA-4E0A-4640-B375-62B79F67AFF8}" targetID="{3F4B20E9-36E6-4D45-A423-C86567373F82}"/>
<!-- File template -->
<add sourceID="{611933AC-CE0C-4DDC-9683-F830232DB150}" targetID="{962B53C4-F93B-4DF9-9821-415C867B8903}"/>
<!-- Path field -->
<add sourceID="{F8339D09-C19B-452A-A5A8-A189972DF23A}" targetID="{47FA03A6-A52C-4BE7-A726-B3A8BB3254D6}"/>
<!-- Description field -->
<add sourceID="{EBEB197C-376E-47C4-95D7-7FC26682D12E}" targetID="{BA8341A1-FF30-47B8-AE6A-F4947E4113F0}"/>
<!-- Title field -->
<add sourceID="{E625E7DA-F988-4442-A598-D21040EC9815}" targetID="{3F4B20E9-36E6-4D45-A423-C86567373F82}"/>
<!-- GIF template to unversioned Image template -->
<add sourceID="{27F12339-1571-482B-B39D-B03004CCF2AD}" targetID="{F1828A2C-7E5D-4BBD-98CA-320474871548}"/>
<!-- Path field -->
<add sourceID="{ABD37B99-FAF4-449B-854F-82C0DAF73B3D}" targetID="{47FA03A6-A52C-4BE7-A726-B3A8BB3254D6}"/>
<!-- Alt field -->
<add sourceID="{D7F6DFE2-151F-4023-8A4A-8D7FE202C39D}" targetID="{65885C44-8FCD-4A7F-94F1-EE63703FE193}"/>
<!-- Description field -->
<add sourceID="{94478368-C3C2-45CC-8D27-C877B416DF14}" targetID="{BA8341A1-FF30-47B8-AE6A-F4947E4113F0}"/>
<!-- Title field -->
<add sourceID="{C17E1045-188C-46F6-B3FD-3997809BEA1A}" targetID="{3F4B20E9-36E6-4D45-A423-C86567373F82}"/>
<!-- Width field -->
<add sourceID="{DF3D60BC-1E58-41A2-A224-269C60A5B6BB}" targetID="{22EAC599-F13B-4607-A89D-C091763A467D}"/>
<!-- Height field -->
<add sourceID="{68217488-CE8E-4998-8780-29816CCCD15B}" targetID="{DE2CA9E4-C117-4C8A-A139-1FF4B199D15A}"/>
<!-- Vertical resolution field mapped to the vertical resolution of the image field -->
<add sourceID="{E14071A1-3D5D-491C-9A6E-37A66429B44C}" targetID="{337274F2-2E48-41B1-B0B8-56C7D5F7C813}"/>
<!-- Horizontal resolution field is mapped to the horizontal resolution of the image field -->
<add sourceID="{D572FD07-28E2-4083-BC47-607496F86EDA}" targetID="{48A65837-49E3-42EE-91ED-75056DAE12D5}"/>
<!-- BitDepth field is mapped to the BitDepth of the image field -->
<add sourceID="{5A57AB2A-2629-49F4-A612-63850217C291}" targetID="{A20F4915-90D5-4070-A051-5F7AAB4DDB24}"/>
<!-- JPG template to unversioned JPG template -->
<add sourceID="{2EE734A4-D085-45D1-B924-66F799CC8D2C}" targetID="{DAF085E8-602E-43A6-8299-038FF171349F}"/>
<!-- Path field -->
<add sourceID="{05193A2D-F4EB-463C-891A-97C2CB3D84FB}" targetID="{47FA03A6-A52C-4BE7-A726-B3A8BB3254D6}"/>
<!-- Alt field -->
<add sourceID="{380E074F-A4AE-451B-B1CA-A6E8B3DB479A}" targetID="{65885C44-8FCD-4A7F-94F1-EE63703FE193}"/>
<!-- Description field -->
<add sourceID="{2A9F5FCB-88F1-4EC8-B4E6-F8DF6D527CB5}" targetID="{BA8341A1-FF30-47B8-AE6A-F4947E4113F0}"/>
<!-- Title field -->
<add sourceID="{DC065C5F-53DF-4525-853C-A1D888B25431}" targetID="{3F4B20E9-36E6-4D45-A423-C86567373F82}"/>
<!-- Width field -->
<add sourceID="{68CB12D0-5C46-41A0-B04D-4B57B14896E8}" targetID="{22EAC599-F13B-4607-A89D-C091763A467D}"/>
<!-- Height field -->
<add sourceID="{9D8A8798-B67A-456F-A06E-7D48E6027A13}" targetID="{DE2CA9E4-C117-4C8A-A139-1FF4B199D15A}"/>
<!-- Vertical resolution field mapped to the vertical resolution of the image field -->
<add sourceID="{9E1BF6CC-6DEF-49E9-BEF8-DC6E6CA4E10D}" targetID="{337274F2-2E48-41B1-B0B8-56C7D5F7C813}"/>
<!-- Horizontal resolution field is mapped to the horizontal resolution of the image field -->
<add sourceID="{8B081FF0-35CA-4DA5-AC58-9A40ACAFFC17}" targetID="{48A65837-49E3-42EE-91ED-75056DAE12D5}"/>
<!-- BitDepth field is mapped to the BitDepth of the image field -->
<add sourceID="{C1D814F1-6663-423A-95DF-BF524613C78D}" targetID="{A20F4915-90D5-4070-A051-5F7AAB4DDB24}"/>
<!-- end media templates mapping --> 1.7.3.
invalidItemNameHandlers Section
1.7.4.
preprocessing Section
1.7.5.
fieldHandlers Section
If the value is on, then the new media items will be created in the “Migration folder” of the Media Library using the links to the physical files which still don’t exist in the Media Library.
Media items will be created only if their paths start with this value.
1.7.6.
itemHandlers Section
Use to handle proxy items (go to the /sitecore/system.proxies item and fill the appropriate fields of the proxy item)
Use to change the html field type to the rich text type. Now you can use the contentMapping instead of this handler.
Use to assign the ‘Sitecore Client Authoring’ role to the transferred Sitecore client users. This functionality is needed because in the current Sitecore CMS 5.3.1 version a user should have ‘Write’ right to the language item to be an Editor. Previous Sitecore versions didn’t check this. So all transferred users should have this right by default. More about Sitecore client roles you can find here:
http://sdn.sitecore.net/Articles/Security/Sitecore%20Client%20Roles.html
{
public class RichTextReplacer : IItemHandler
{
#region IItemHandler Members
public void HandleItem(Sitecore.Data.Items.Item item, TransferredItem[] sourceVersions, TransferOptions options)
{
if ((item != null) && (item.TemplateID == TemplateIDs.TemplateField))
{
if (string.Compare(item["Type"], "html", true) == 0)
{
item["Type"] = "rich text";
}
}
}
#endregion
}
}1.7.7.
versionHandlers
2.
General Recommendations
3.
FAQ
Q:
A:
Q:
A:
Q:
A:
Q:
A:
Q:
A:
Q:
A:
Exception: System.Data.SqlClient.SqlException
Message: A severe error occurred on the current command. The results, if any, should be discarded.
A severe error occurred on the current command. The results, if any, should be discarded.
Source: .Net SqlClient Data Provider
...
at Sitecore.Data.SqlServer.SqlServerLinkDatabase.UpdateLinks(Item item, ItemLink[] links)
at Sitecore.Links.LinkDatabase.UpdateReferences(Item item)
at Sitecore.Links.ItemEventHandler.OnItemSaved(Object sender, EventArgs args)
at Sitecore.Events.Event.EventSubscribers.RaiseEvent(String eventName, Object[] parameters, EventResult result)
at Sitecore.Events.Event.EventSubscribers.RaiseEvent(String eventName, Object[] parameters)
at Sitecore.Events.Event.RaiseEvent(String eventName, Object[] parameters)
at Sitecore.Events.Event.RaiseItemSaved(Object sender, ItemSavedEventArgs args)
at Sitecore.Events.Event.DataEngine_ItemSaved(Object sender, ExecutedEventArgs`1 e)Q:
A: